| Scirocco Engine Swap - Audi 3A 2.0L 8V Block / JH Head | |||||||||||||||||||||||||||||||||||||||||||||||||||||||||||||||||||||||||
| So, you're looking for more
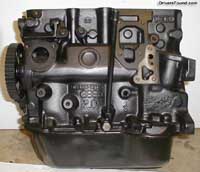
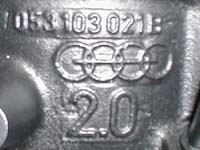
power? As the old saying goes, "there's no replacement for displacement." Here we are going to cover the basics of swapping the stock 1.8L 8V block (JH) for the 2.0L 8V block (3A) found in the 1988 to 1990 Audi 80 (possibly also 1991/1992) and some Audi 90's (years unknown). This is a very straight forward engine swap that will be unnoticable in appearance to most people. Basically, you take a stripped 3A block and bolt all your stock parts to it. Simple, eh? Specifications for the stock Audi 3A motor: |
 |
||||||||||||||||||||||||||||||||||||||||||||||||||||||||||||||||||||||||
|
|||||||||||||||||||||||||||||||||||||||||||||||||||||||||||||||||||||||||
| Overview | |||||||||||||||||||||||||||||||||||||||||||||||||||||||||||||||||||||||||
When planning this
swap, several questions arose:
While answers varied, I was looking for the most straight forward swap. This meant retaining as many stock parts as possible, maintaining stock appearance, using factory fuel injection, and being very reliable. I also questioned myself about how far to take this project,
and was left with two choices: (1) keep cost to a bare minimum without sacrificing
reliability and enjoy a substantial power increase, and (2) ignore all common sense, drain
the bank account and build an expensive turbo motor. Since the motor only had 95,000
and was very clean, I chose to simply "drop it in" and feed the appetite for
power, without going overboard. |
|||||||||||||||||||||||||||||||||||||||||||||||||||||||||||||||||||||||||
| Head | |||||||||||||||||||||||||||||||||||||||||||||||||||||||||||||||||||||||||
| This was an easy
decision. My head was recently refreshed and had a G-grind cam installed. I also
wanted to keep the stock fuel injection. The head was removed with the manifolds
attached and set aside. If you haven't done any headwork, now is the time. A valve
job, valve seals, cam, and porting are all recommended. It is possible to use the Audi 80 head, but for simplicity, stick with
the stock JH head. |
|||||||||||||||||||||||||||||||||||||||||||||||||||||||||||||||||||||||||
| Head Gasket | |||||||||||||||||||||||||||||||||||||||||||||||||||||||||||||||||||||||||
| Use the Audi 80 2.0L head gasket. | 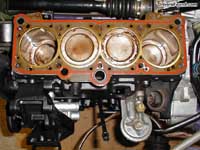 |
||||||||||||||||||||||||||||||||||||||||||||||||||||||||||||||||||||||||
| Breather Assembly | |||||||||||||||||||||||||||||||||||||||||||||||||||||||||||||||||||||||||
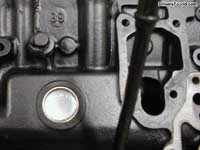
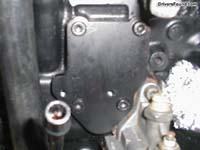
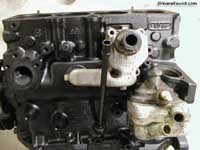
| The Audi breather assembly was
removed, which left two holes to fill. The round hole was easily filled using a
freeze plug. The remaining hole was covered with a plate that was drilled and tapped to
allow mounting of the warm up regulator in its factory location.
Blockoff kit available from GAK Motorsports |
|
||||||||||||||||||||||||||||||||||||||||||||||||||||||||||||||||||||||||
| Oil Pan/Oil Pump | |||||||||||||||||||||||||||||||||||||||||||||||||||||||||||||||||||||||||
| Due to the fact the Audi 80 engine was mounted longitudally instead of transversely like the Scirocco, the Audi oil pan and pump must be removed and the original Scirocco parts used. Also, the Audi oil pump was designed for a hydraulic head, and not the solid lifter head. | 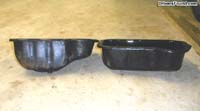 |
||||||||||||||||||||||||||||||||||||||||||||||||||||||||||||||||||||||||
| Audi 80 2.0L oil pump | 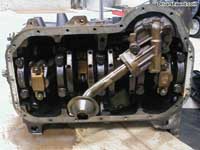 |
||||||||||||||||||||||||||||||||||||||||||||||||||||||||||||||||||||||||
| VW 1.8L oil pump Note: If you buy a new oil pump, casting flaws in the oil pump housing
may require filing to allow the oil pan to fit. |
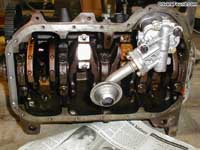 |
||||||||||||||||||||||||||||||||||||||||||||||||||||||||||||||||||||||||
| Pulleys | |||||||||||||||||||||||||||||||||||||||||||||||||||||||||||||||||||||||||
| The timing belt sprockets
(crankshaft and intermediate shaft) are the same as the Scirocco, so you do not need to
change them unless they are damaged. You will need to use the Scirocco crankshaft pulley,
and waterpump and pulley. Audi pulley shown to right |
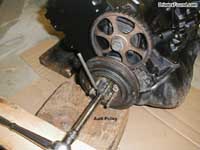 |
||||||||||||||||||||||||||||||||||||||||||||||||||||||||||||||||||||||||
| Scirocco pulley shown to right. Tip: When removing socket head cap screws, a bit of valve grinding compound gives extra grip to help avoid stripping the head. |
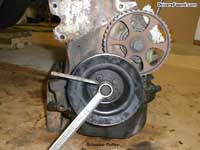 |
||||||||||||||||||||||||||||||||||||||||||||||||||||||||||||||||||||||||
| Be sure to replace the seals while prepping the block. The rear main seal is especially important because oil leaks can damage the clutch. | 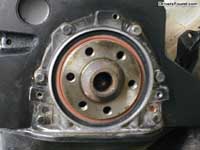 |
||||||||||||||||||||||||||||||||||||||||||||||||||||||||||||||||||||||||
| Clutch | |||||||||||||||||||||||||||||||||||||||||||||||||||||||||||||||||||||||||
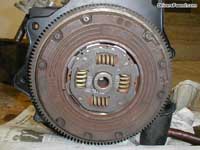
| The stock VW 210mm clutch will work fine. Upgrades are available which should be considered especially if your clutch needs replaced. | 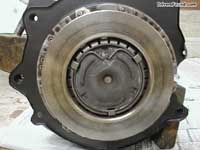 |
||||||||||||||||||||||||||||||||||||||||||||||||||||||||||||||||||||||||
 |
|||||||||||||||||||||||||||||||||||||||||||||||||||||||||||||||||||||||||
| Exhaust Manifold/Downpipe | |||||||||||||||||||||||||||||||||||||||||||||||||||||||||||||||||||||||||
| The 3a block is the
same height as the JH block, so your original exhaust manifold and downpipe will work
fine. |
|||||||||||||||||||||||||||||||||||||||||||||||||||||||||||||||||||||||||
| Distributor / Knock Sensor | |||||||||||||||||||||||||||||||||||||||||||||||||||||||||||||||||||||||||
| You have two choices when considering what distributor to use: (1) a modified Scirocco distributor or (2) an Audi 80 distributor with the addition of a factory knock sensor. | 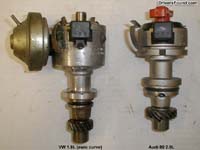 |
||||||||||||||||||||||||||||||||||||||||||||||||||||||||||||||||||||||||
(1)
A modified 1.8L Scirocco distributor: This requires swapping the gear at
the bottom to a 3A gear and the use of an adapter plate. You CAN NOT use a knock
sensor with this distributor. You will need to use high octane gas and conservative
timing to avoid engine damaging knock.
|
|||||||||||||||||||||||||||||||||||||||||||||||||||||||||||||||||||||||||
| (2)
An Audi 80 distributor with the addition of a factory knock sensor: This
distributor will drop straight in to the block with no modifications. You will need the
rotor that is made for this distributor. The factory wire connector will plug in
and the engine will run, BUT without the addition of a knock sensor, you will have no
timing advance (and a lot of missing power!). You MUST add a factory knock sensor
when using this distributor. The knock sensor will control timing advance and retard when
dangerous engine knock occurs. Click here for Knock Sensor Installation information.
|
|||||||||||||||||||||||||||||||||||||||||||||||||||||||||||||||||||||||||
| Fuel Mixture Adjustment | |||||||||||||||||||||||||||||||||||||||||||||||||||||||||||||||||||||||||
| Just when you thought
you were finished, there is one more important thing to do - adjust the fuel mixture. Click here for CIS Fuel Mixture Adjustment information.
|
|||||||||||||||||||||||||||||||||||||||||||||||||||||||||||||||||||||||||
| Miscellaneous Observations | |||||||||||||||||||||||||||||||||||||||||||||||||||||||||||||||||||||||||
|
|||||||||||||||||||||||||||||||||||||||||||||||||||||||||||||||||||||||||
| Tips aka "Leasons Learned" | |||||||||||||||||||||||||||||||||||||||||||||||||||||||||||||||||||||||||
|
|||||||||||||||||||||||||||||||||||||||||||||||||||||||||||||||||||||||||
| Cost Overview | |||||||||||||||||||||||||||||||||||||||||||||||||||||||||||||||||||||||||
Below is a list of
costs incurred while doing this swap. This meant simply as an example to help you
plan your project. Your prices will vary. The oil pump and water pump were replaced
because they had 200,000 miles on them. The fuel injector was replaced because the end
pulled off during removal.
|
|||||||||||||||||||||||||||||||||||||||||||||||||||||||||||||||||||||||||
| Summary | |||||||||||||||||||||||||||||||||||||||||||||||||||||||||||||||||||||||||
Swap stock Scirocco JH
1.8L block for Audi 80 3A 2.0L
|
|||||||||||||||||||||||||||||||||||||||||||||||||||||||||||||||||||||||||
| Specifications on the Audi 80 can be found in the AudiWorld Model Guide. |
|||||||||||||||||||||||||||||||||||||||||||||||||||||||||||||||||||||||||

